Hey (waving hand emoji). I finished my first DKC Staff Project!
The Assignment
The DKC works with the Speaking and Writing Center to deliver presentations to FSEMs to introduce freshmen to the different academic services offered at UMW. As part of that presentation, we show a video that gives a brief overview of the DKC. The audio is muted for the presentation, and the presenter just gives their own spiel.
However–the video was redone this year, and the old voiceover no longer quite matches. So, since I expressed interest in video and audio editing, I was tasked with recording a new voiceover for the DKC intro video.
I booked the podcast studio and got to work. It was more difficult than I thought it would be because I couldn’t just write a script–I also had to match up the timing of my speaking to the pre-determined timing of the video.
After much trial and error, and some helpful suggestions from Shannon and Cartland, I finished the voiceover.
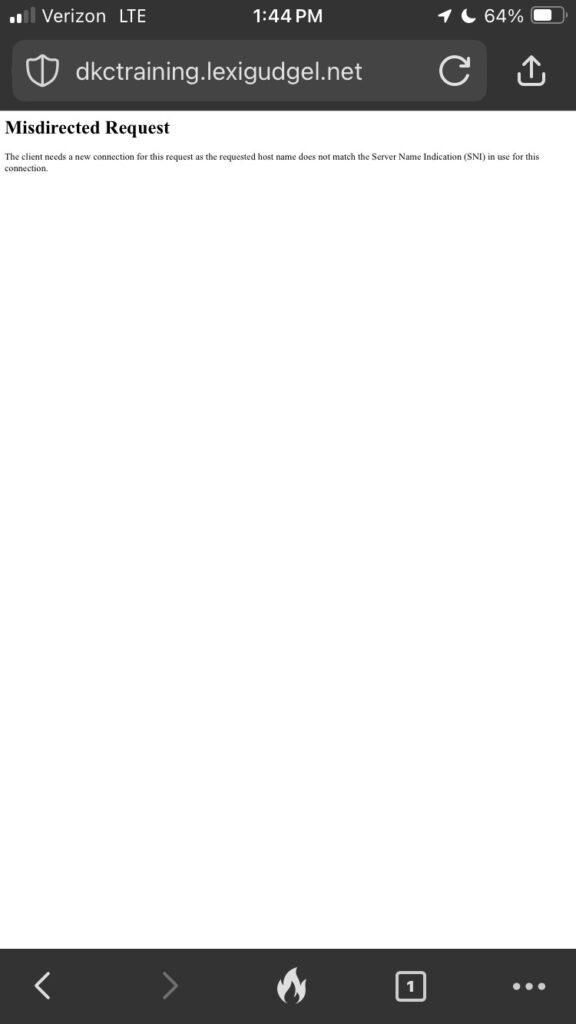
Aye yi yi was this frustrating. For an assignment I had to break my website and then troubleshoot it. I have zero experience troubleshooting, so this was not fun.
To break my DKC training website, I changed both the site URL and WordPress URL from “dkctraining.lexigudgel.net” to different variations of that. The reason this messed up my site is that when you tried to go to my real URL, it got confused and tried to redirect you to those variations which don’t actually exist. I couldn’t even access the backend of my site to rechange the site and WordPress URL.
This is what it looked like when you tried to access my website from a phone.
Let the Googling commence. I had no idea where to start, so I went to online forums, the WordPress online support website, and random articles. From what I could gather, there were several ways to go about this problem. Some articles suggested redirection and others suggested changing the code.
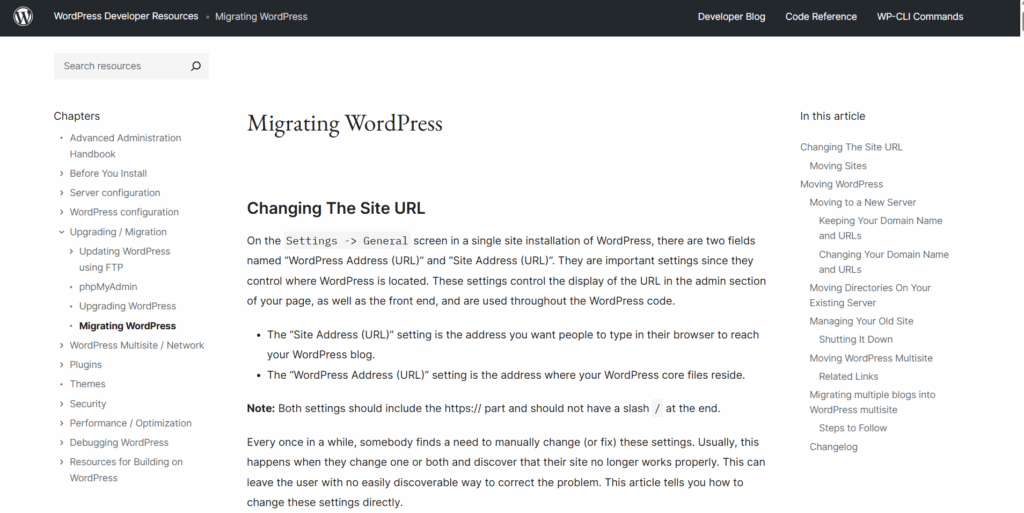
I eventually stumbled across this article:
I have no idea what the wp-config.pfp file is or what it does, but it gave the most detailed instructions so I decided to go with it. Toward the bottom of the article, it explained how to fix the problem I was encountering:
“You may need to change WordPress URLs when moving a WordPress site to a new domain name. […] You can also change these URLs using the wp-config.php file. This comes in handy if you are unable to access the WordPress admin area due to the error too many directs issue. Simply add these two lines to your wp-config.php file:
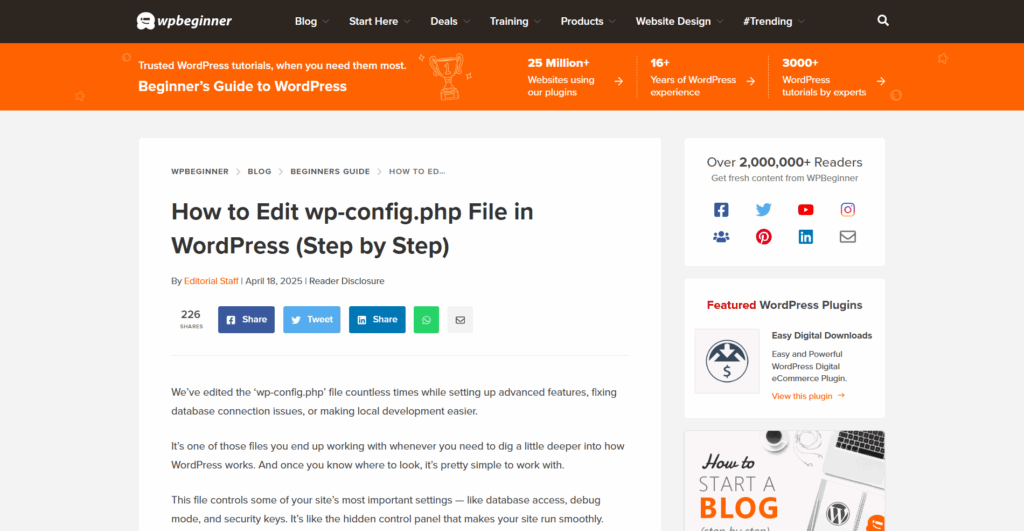
Now, I haven’t the faintest clue how coding works or what any of that means. While it’s definitely not best practice to copy and paste random code you find off the Internet, I trusted this article that seemed to know my exact situation eerily well. So I located the wp-config.pfp file in my file manager and exported it to the Microsoft notepad application.
Once I pasted in those two lines of code, I tried to simply import it back it. Here is where the real frustration set in. I thought that importing it would override the first wp-config.pfp file and replace it with the new code I wanted, right? Wrong. It just added an additional file into my file manager that was called “wp-config.pfp.txt” and did seemingly nothing. I still couldn’t access the front or backend of my site. My best guess is that because I was importing a file saved from the Notepad app, it automatically saved as a txt file that I couldn’t change.
After trying this several times, I was out of ideas. Google wasn’t helpful either. Eventually, I noticed that there was an edit button near the download, import, and export buttons. Duh. So as an incredibly uneducated coder, I decided to edit the wp-config.pfp code directly and see what happened.
Well, at first, nothing. Silly me, that’s because I didn’t change the code from “http://example.com” to my real URL. So I did that. And it still didn’t work. Oh, it’s probably because I didn’t add in the “s” in https. Haha. But it still didn’t work.
Ahh… that would be because I had typed in “dkctraining.lexigudgel.com,” not “dkctraining.lexigudgel.net.” Jeez, this is embarrassing.
FINALLY, I got my website up and running. I could access the front and backend. The only difference is now I can’t go back in and change the site and WordPress URL because I hard coded those in. Well, I don’t plan to do that in the future so I’m not torn up about it. If anything, it’ll stop me from accidentally doing that same thing in the future. Plus, if I ever wanted to for whatever reason, I can just go back into the wp-config.pfp file.
In conclusion, I figured it out, but I think my computer and troubleshooting skills should be used only a last resort to help people.
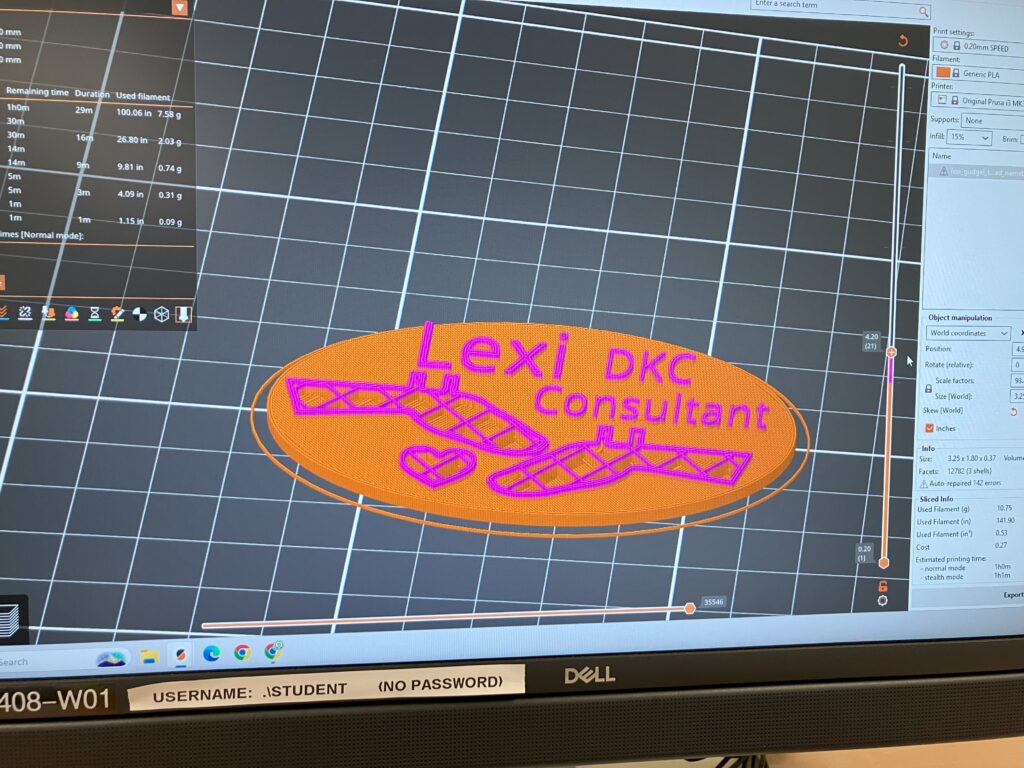
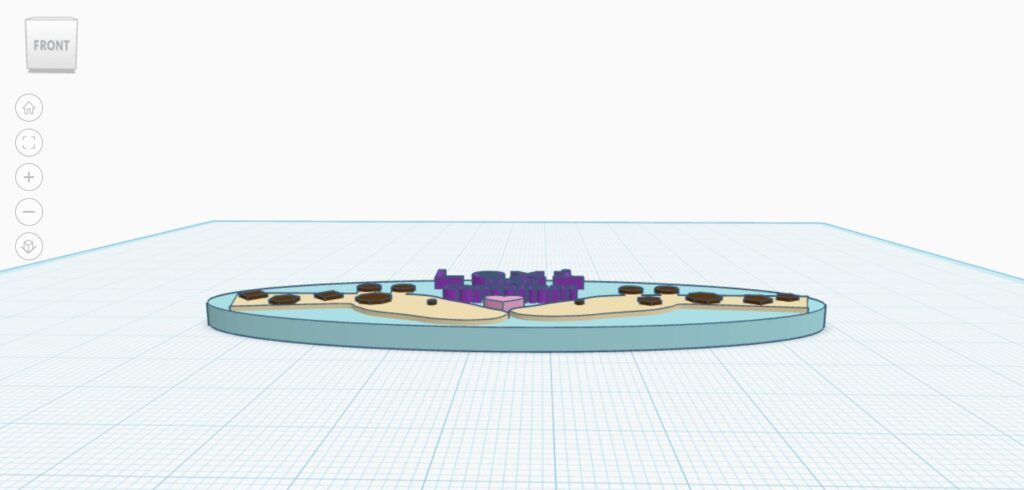
Well, here we are again. After the Disaster That Shall Not Be Named, I had to reprint my nametag. Luckily, I wasn’t starting from scratch–just fixing what I already had. After giving it some thought, I figured out the issue: it wasn’t just that my nametag was small overall, but the proportions were messed up (the giraffe was too thin compared to the base, the eyes were too small compared to the rest of the giraffe and nametag, etc.).
While I was back in Tinkercad, I decided to change up the design a little more by making the base more circular as opposed to oval shaped, as well as stacking the giraffes on top of each other.
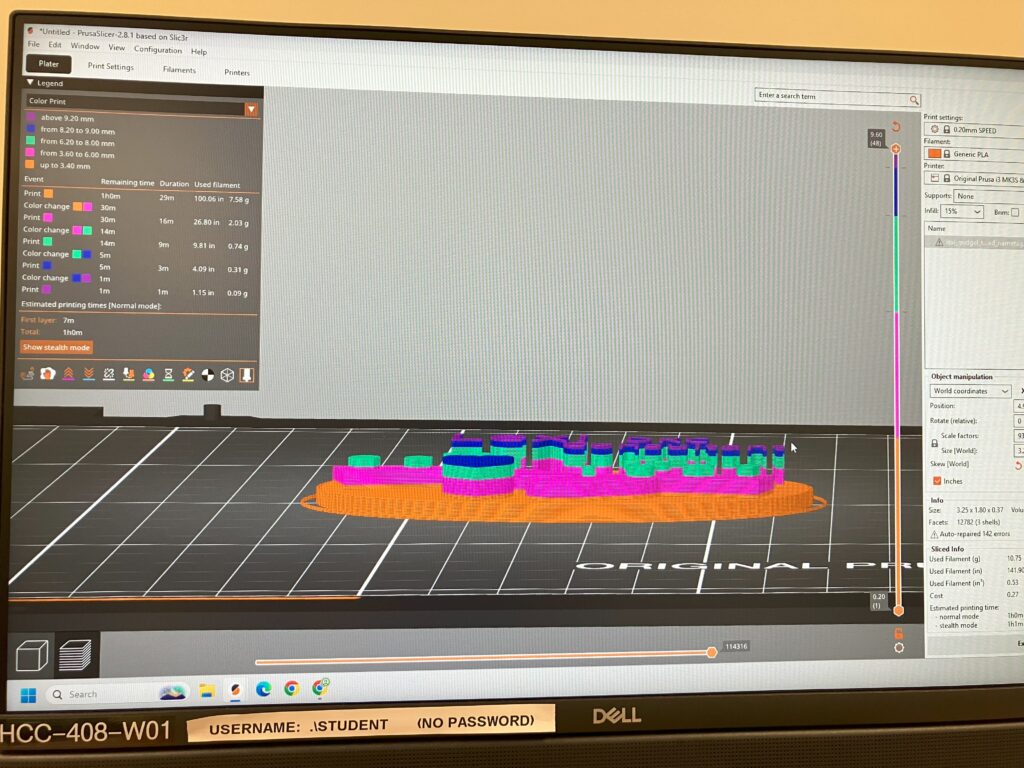
I found it much easier to use the Prusa slicer a second time around. Adding the color change stops went much quicker, but adjusting the dimensions took me a while.
Here are some pictures from that process:
Since I was printing a thicker nametag it took over 20 minutes longer than my first print. I stayed by the 3D printer the entire time to monitor it and make sure everything went smoothly/I could change out the filament as quickly as possible.
I have some pictures of the printing:
Here was the end result!
Of course, while trying to clean it up, I immediately accidentally ripped out the dot in the “i” in my name, but by this point I’m so over this that I’m fine with it.
Every DKC consultant is tasked with creating their own nametag, and since I’ve never used a 3D printer before, I was excited to learn something new.
First I had to get started in Tinkercad, which is one of the softwares the DKC recommends for 3D prints. I found it pretty user-friendly, and I especially appreciated Tinkercad’s getting-started guides. (I would definitely recommend using a mouse when using Tinkercad. My hand was cramping so badly before I borrowed one from our storage.)
In the beginning, I really struggled to think in terms of layers. I was worried about making sure I could have my name a different color than the background and design. It wasn’t until Shannon drew it out on the whiteboard for me that I better understood how to do so.
For my nametag I drew direct inspiration from Angela’s nametag. I really like her pig design, so I decided to incorporate my favorite animal: the giraffe. Originally I was going to make the whole thing in the shape of a giraffe, but I realized that since giraffes are long and skinny there wouldn’t be a lot of room for my name and title.
I Googled “giraffe cartoon” and went to images, which is where I got the idea for two giraffes nuzzling. I also inspected Katy’s and Haley’s nametags to learn what I wanted the backing surface to be. I settled on an oval.
The most difficult part of designing the nametag was the giraffes. Tinkercad works in shapes, and I didn’t like the look of combining a rectangle and oval for the neck and head. I instead used some sort of drawing tool where I could create my own shape. It was hard to draw using my mousepad, but luckily there was a smoothing tool I could use on the lines. After a few tries, I had something that I actually liked and thought looked natural.
After that was out of the way, it was just a matter of adjusting the height of everything and making sure the layers were laying flat on each other. Originally, I used a cylinder shape for the base because I figured, “Oh, I’m working in 3D so I should use a cylinder.” Nope. Katy showed me my mistake and I changed it to a circle so that the giraffes, heart, and lettering could lay flat on its surface.
It was surprisingly frustrating to get the giraffe shape to lie flat on the circle, the spots to lie flat on the giraffe, etc. I kept thinking I was okay, and then I’d rotate the screen and see that the letters were actually hovering in the air above the backing.
I have some pictures below of what my nametag looks like in Tinkercad!
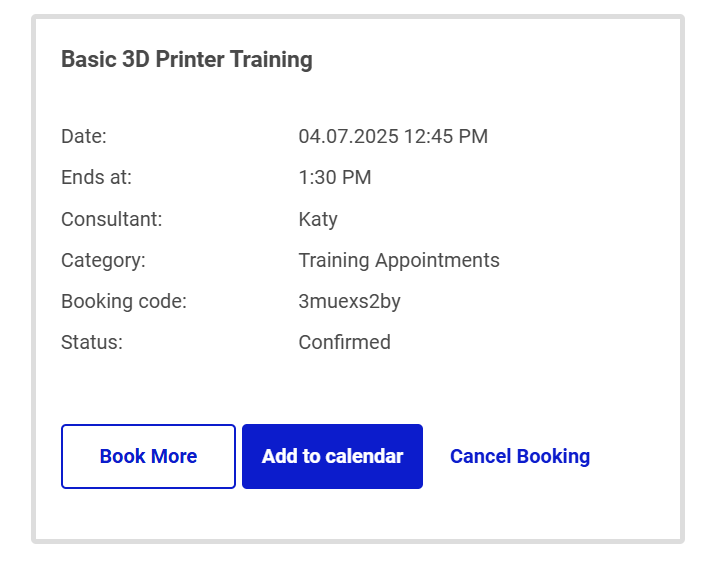
Next I had to get trained on the 3D printer. I probably should have gotten the training before I started designing so I would have had a better idea of how the machine works, but oh well. I booked a training appointment with Katy for a Monday at 12:45, so I just came into my shift 15 minutes early.
I had gotten a brief overview of the 3D printer during my orientation right before the start of the semester, but I had totally forgotten everything. It was nice to get a refresher and then a better rundown of the Prusa slicer software. I got to print a test-run Edmund!! Here he is below. I think I’ll give him to my sister when I go home for Easter.
Yes, part of his left foot and the back of his tail are black. Someone had been using black filament before me, so there must’ve been some still stuck in the nozzle. I thought we had cleaned it out pretty good when loading the pink filament, but I guess not…. It’s kind of strange that the black showed up in those areas and not the very first layer, but it’s okay.
Time to print my nametag now! The 3D printer is a very popular machine–I had to book a week out from my training appointment! The first of several snags that I ran into was that the computer I used wouldn’t connect to the ethernet, so I decided to just hop one computer over. Except that computer didn’t have the Prusa slicer application…. Shannon was able to get it downloaded pretty quickly, but I was starting to get a little nervous because I only had a two hour timeslot to print.
Once I conquered the technical difficulties, it was time for Prusa difficulties. Katy generously showed me how to add stops in the print for a color change, and it took me a surprisingly long time to get it the way I wanted it. Then it was a matter of sizing the print correctly. Using Haley’s nametag for reference, I decided I wanted it to be about 3.5in x 1.5in. The height was another beast altogether, and I settled on 6mm.
But wait a second… why do the “t”s in the word “consultant” look weird all of a sudden? Turns out, with the font I used on Tinkercad and the size of my nametag, the top of the the letter “t” is thinner than the nozzle, so it can’t print it fully. Ultimately I went the lazy route and decided it was still readable and therefore fine.
After exporting to an SD card, I was ready to print! I could tell throughout the printing process that something wasn’t quite right, but I thought you just had to have faith in the process. I was wrong.
After 42 minutes, I finally had this:
Yikes…
I am not at all happy with the way it turned out. The words are too small to read, the eyes on the giraffes are too small, there’s a lot of globbing of the filament all over, and the nametag in general is too thin and too short.
You know what that means–back to Tinkercad! *sigh*
I will keep you updated as I try to fix this mess.
I used professional video and audio equipment! Yay!!
So you’re probably wondering what I mean. Well first, I need to back up in a little in my story….
The DKC hosts free workshops to teach UMW student skills such as: sewing, using Canva, building a personal brand, customizing YouTube banners, etc. Any student is able to attend or lead a workshop.
For April Fool’s Day, I was given the task of creating a prank workshop. I had to make a graphic as well as a video to advertise my fake workshop on April 1.
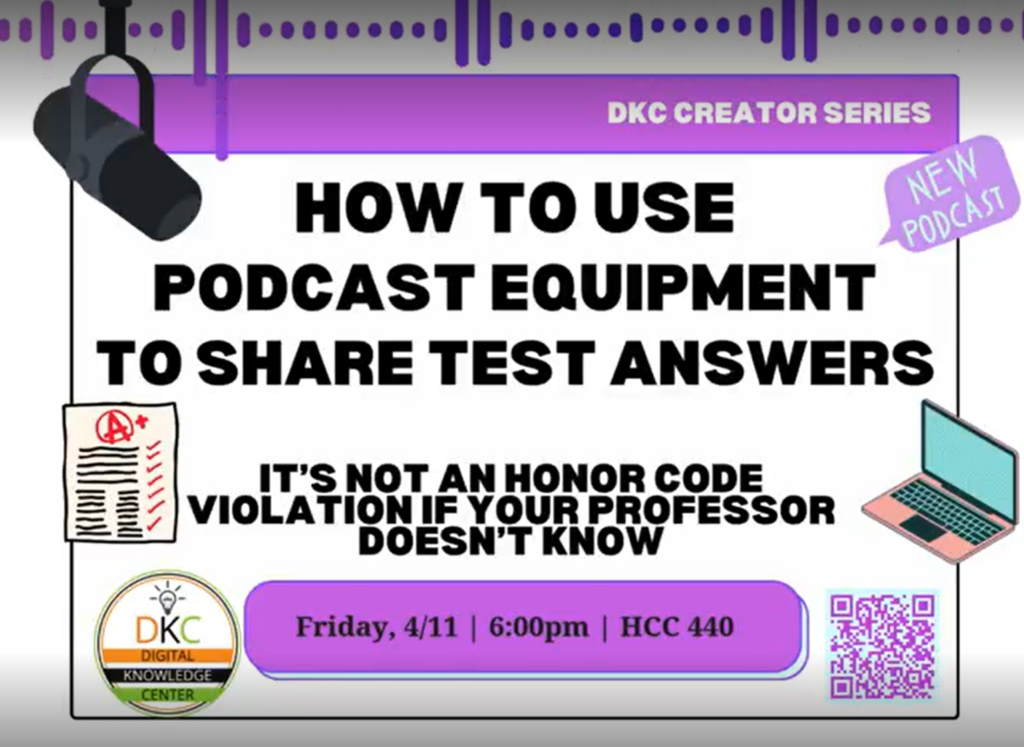
To get started I brainstormed some ideas for what fake workshop I’d want to host. I settled on “How to Use Podcast Equipment to Share Test Answers: It’s Not an Honor Code Violation if your Professor Doesn’t Know.” Do I know exactly how one might use podcast equipment to cheat? Not really. But that doesn’t matter.
Using the DKC’s Canva template for the workshops, I created this graphic:
On to the video! I wrote up a script and rough storyboard. Using my skills of persuasion (see: coercion), I convinced some of my fellow DKC consultants to star in my production. Katy played a cheating student (typical) and Angela channeled her best teaching energy. Katy even graciously accompanied me downstairs to the big and scary HCC info desk to check out equipment for the first time.
The recording went pretty smoothly, especially considering I haven’t used a DSLR is years and I didn’t know much to begin with. The tripod gave me a bit of trouble (is there an easy way to make sure all the legs are adjusted to the same height?), but it was a lot of fun; I felt so professional using such nice equipment.
For the audio I wanted to utilize my new podcast training–plus it’d be on brand for the graphic–but I was convinced to try something new and learn how to use the mic packs from the HCC audio kits. It turned out to be really easy: I plugged the receiver into my phone and used the Voice Memos app, then just talked into the handheld mic.
I’m glad I decided to use the audio kit, but I’m still anxiously awaiting an opportunity to record using the podcast studio.
I survived my third mock consultation! In theory this should’ve been one of the easiest ones because it was just a lot of font issues. In reality though? I didn’t know how to do most of the things Mayday asked of me. Oops.
So to answer the question of what parts felt tricky, I would say the entire consultation. To handle this, I did some Googling (unhelpful) and asked Shannon (very helpful).
Were there any parts of the consultation that made me feel confident? Ehh… perhaps the only thing I felt confident about was that I knew what the student wanted. I figured that out by asking questions to gauge what Mayday’s purpose was behind the formatting issues. I think this helped build a friendly relationship and make the consultation come out overall positive even if it took me forever and there wasn’t a satisfactory answer to one of the formatting problems.
I was able to successfully help Mayday add categorized blog posts to her menu without enlisting the help of anyone else, so that made me feel better.
Next time, I will make sure to ask more clarifying questions on the scope of the help they need. Since I didn’t ask Mayday how many formatting issues she was having, I had assumed the font color was the only thing she wanted to change. Little did I know the battle ahead of me over image wrapping and indenting.
From this experience, I learned that my consulting style is still unsure of myself, although very encouraging of my clients. I hope to build more confidence in the future as I get more practice and poke around more with WordPress.
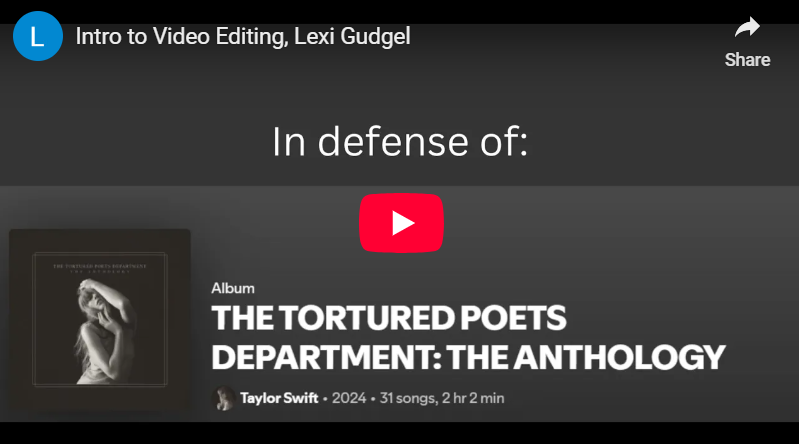
Well, here we are. After way too long I’ve finished creating my video assignment and captions.
Here is it: “In Defense of The Tortured Poets Department.” Which, again–objectively a great album. (“Midnights” was so good too. I think Taylor is getting too much flack for her newer albums.)
Here is the transcription of my video:
Lexi: “Why ‘The Tortured Poets Department’ by Taylor Swift was my 2024 summer anthem. First of all, it has an absolute banger of an opener, ‘Fortnight,’ and it includes ballads like ‘So Long, London.’”
[excerpt of “So Long, London” by Taylor Swift begins playing] “You swore that you loved me, but where were the clues?/I died on the altar waiting for the proof/You sacrificed us to the gods of your bluest days.”
Lexi: “We can’t forget ‘The Alchemy,’ which gives off the strongest of summer vibes. Yes, there were some skips in there, but those are more than made up for by the others. ‘Tortured Poets’ is perfect for scream-singing in the car, windows down. Which is what I did all summer.”
The audio I incorporated into the video was the song “So Long, London” by Taylor Swift taken from Spotify. All pictures used were either screenshots from Spotify, grabbed off of Google Images, or pictures I took on my phone.
I had never used the Canva video editor before, and as someone who grew up on iMovie, I can say that Canva is terrible. Why am I editing a video in a slideshow/pages-of-sorts format? It was so shocking that at first I thought I was in the wrong place.
I kind of got the hang of it after a bit, but I really didn’t like how I had to cover the entirety of each individual slide instead of just my video taking up the whole screen. If that makes any sense….
If you’ve never used a video editor before and you don’t need to do anything too complicated, Canva would probably be an easy, user-friendly starting place for video editing.
I plan to stay away from it for a while, though.
Once I finally got my video edited, it was time to upload it! Similar to how I’d never used Canva editor before, I’d never uploaded a video to YouTube before (because I’ve never had dreams of being an influencer). It was pretty intuitive, I just walked through the different steps as they were presented to me.
The only place I got a little tripped up on was captioning. Originally I intended to start with YouTube’s auto-captions and just edit them, but I couldn’t figure out how to do that and I was scared of messing something up. So considering it’s a 40 second video and I don’t talk much, I just decided to type the captions myself from scratch, which was really easy using YouTube’s captioning tools. Hopefully I did an okay job….
So I finished right? Well, I ran into some issues along the way.
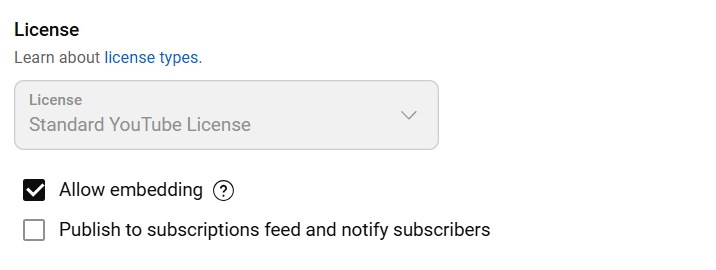
First, I had a heck of a time embedding the YouTube video. The share link wasn’t working and neither was the HTML embedding code. I was getting some error saying that previewing on other websites had been disabled. Huh?
Google revealed that somewhere along the way I had managed to disable the embed feature. Zoe did some poking around for me and found the following instructions posted by Some Random Person on the Internet. (Thank you for your service, geverwills from 4 years ago.)
When I actually got the video embedded, I ran into another problem. The embedded video wasn’t centered on my website page.
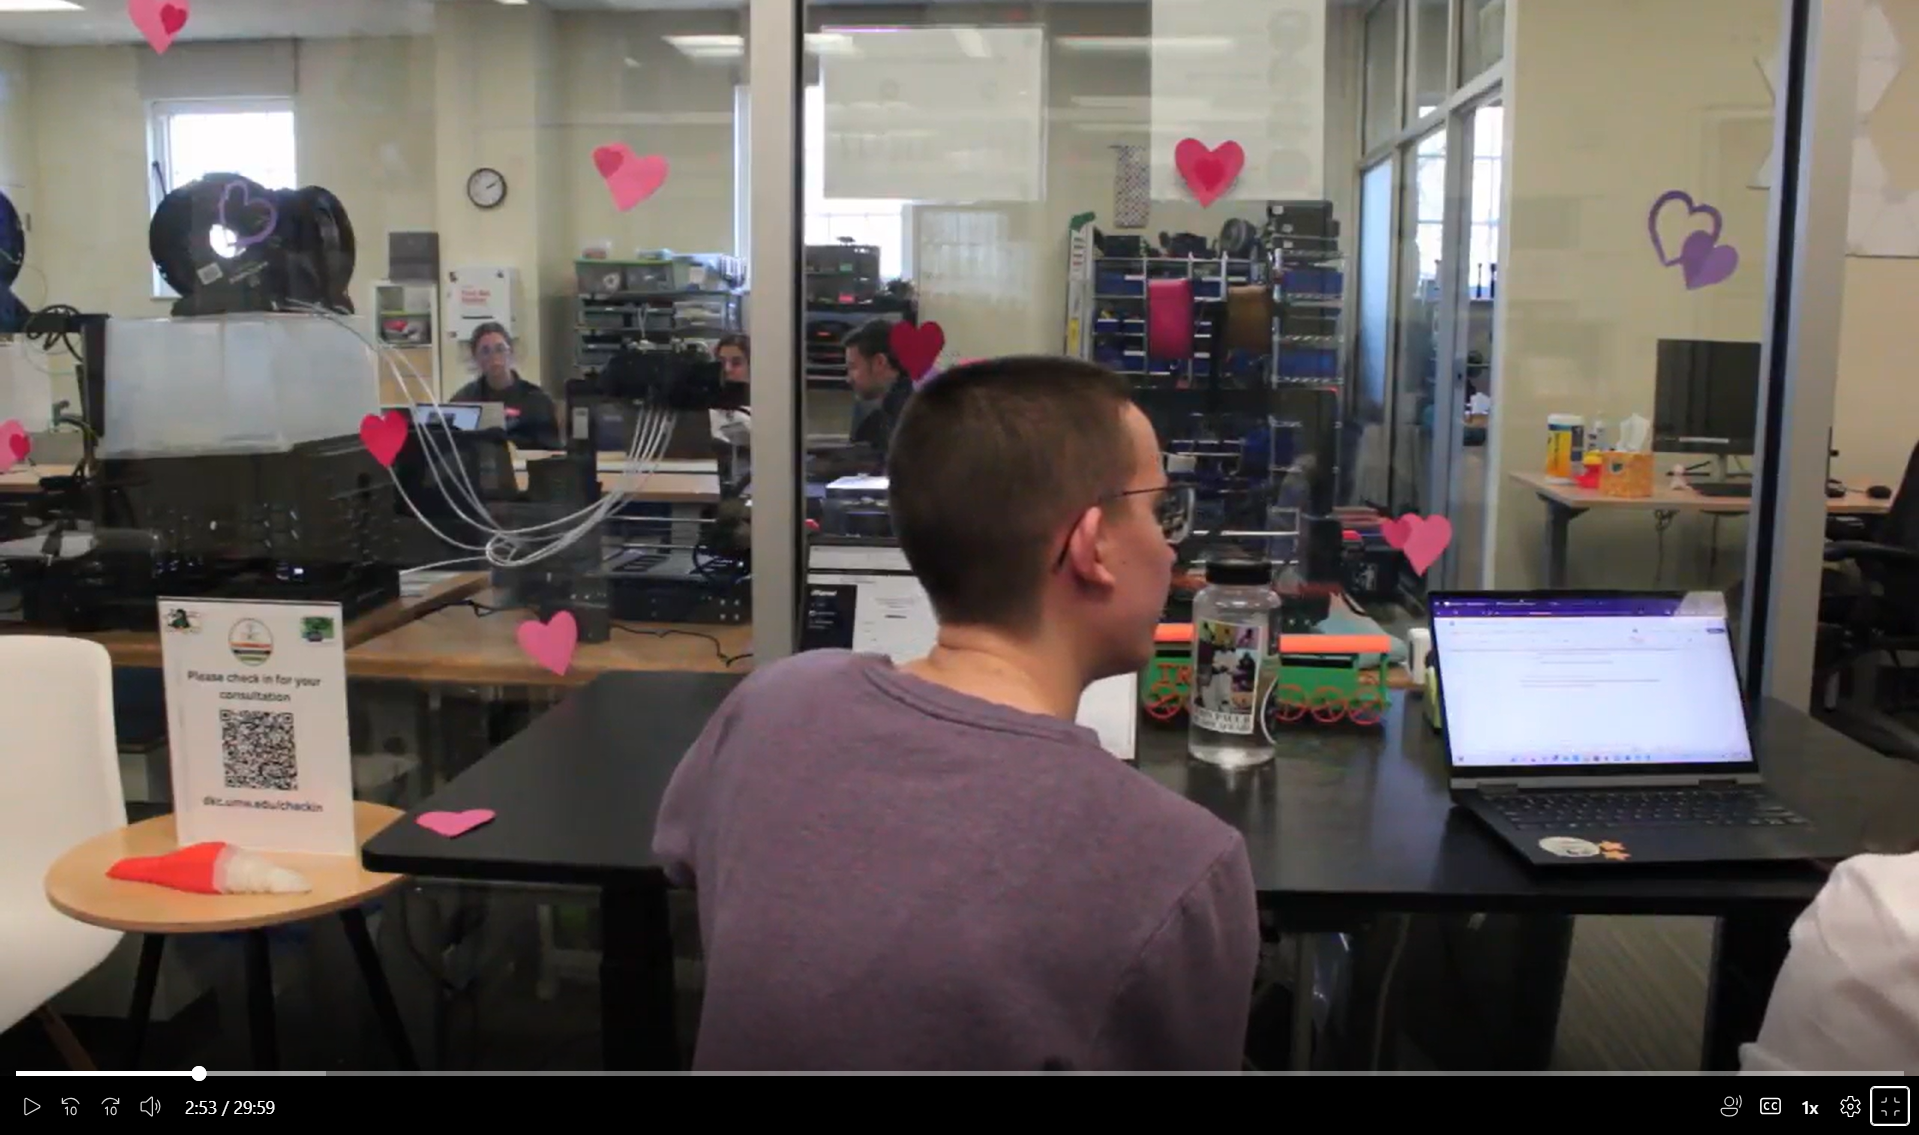
As Katy accidentally captured on film, the world was against me for some reason. Someone didn’t want my video out there. What had I stumbled upon that was so ground breaking that my computer wanted to prevent me from telling the world??
I know nothing about coding, HTML or otherwise, so Zoe once again jumped in as my rescuer.
After some Googling, some ChatGPTing, and some trial and error, Zoe was able to figure out what was wrong with the code: something about creating a container for the style command to restrict the centering to the actual video container. I don’t know. Again, I haven’t a clue how HTML code works.
Finally, my masterpiece is complete. Please enjoy my foray into the Canva video editor!
I have to start this out by saying that it was absolutely brutal to watch half an hour of footage of myself giving a consultation.
Now onto the reflection!
The part of the consultation that I felt most confident in was establishing the subdomain. This is because I was able to practice that skill in my first consultation, so it was fresher in my memory. I got a little tripped up on pro themes, but I asked my fellow consultants for help and Katy gave a great explaination.
By far the trickiest part of the consultation was trying to add a social media button that would lead directly to May Day’s LinkedIn. Since I’m not using my website in a strictly professional manner and I don’t have any social media, I hadn’t even considered how one might link their social media to their website.
After I had her aimlessly click around for a while, May Day took pity on me and discovered the social media button. Even then, I couldn’t figure out how to link it. Oh well. Zoe helped show me afterward, so hopefully I can do it next time.
Another tricky part was figuring out the best way to put May Day’s resume on the website. I think the way I had her do it is wrong. In the future, I believe the best way to link a resume is by inserting a PDF file? (Feli or Zoe correct me in the comments if I’m wrong.)
As for how I went about figuring out the student’s needs, I had May Day pull up the assignment so I could read it myself. I also just let her talk while I listened to what she was highlighting as important for the assignment.
From this experience, I learned that my consulting style right now is “let’s figure this out together.” I would like to say it’s because I want to empower my clients to become more tech savvy, but it’s really because I don’t know much about WordPress or the troubleshooting of it.
Next time, I will try to cut down on the aimless clicking around to figure stuff out. I will do this by asking my coworkers for advice, using the DKC guides (both online and printed), and not being afraid to Google things.
Maybe I can also use my own computer more and see what happens on my website for various things?
I created my own sites@umw. Here is the link to My Sample Site. I chose to theme the website as if it were just an example to be used to model sites@umw to someone who doesn’t know what it is.
I would explain the difference between sites@umw and domain of one’s own as such: sites@umw is a much simpler way to web build. If DoOO is a plot of land, than sites@umw is renting an apartment. The URL is connected to UMW, but you can utilize it for (almost) whatever you want.
Sites@umw has less freedom when it comes to themes and customization, but it’s a little more user-friendly and intuitive than DoOO.
Bad web design
Here is an example post of inaccessible, bad web design. My first example, which you may not have picked up on if you don’t use a screenreader, is that I have an empty text box. I also don’t have a properly formatted title.
Second of all, I’m not listing these examples in a list.
What about this picture I have here? There’s no alt text, so some will never know what it’s a picture of.